MyThinkPond

On Java, Python, Groovy, Grails, Spring, Node.js, Linux, Arduino, ARM, Embedded Devices & Web

Archive for the ‘Technology’ Category

contains information related to technology & science.

First Alert Carbon Monoxide Alarm - tear-down

Posted by Venkatt Guhesan on January 4, 2016

One of my First Alert Carbon Monoxide Alarm’s expired. This gave me an opportunity to look inside and see what’s inside this little gadget.

Here is a picture of the tear-down for those who are interested:

First Alert - Single Station Carbon Monoxide Alarm - model #: CO614

The specification for the carbon-monoxide sensor used in this model can be found here.

Here is a list of alternative carbon-monoxide sensors from Figaro.

Here is an alternative available at SparkFun. (Air Quality MQ135 sensor).

The second picture can be zoomed in by opening the image on a separate window.

Cheers.

Posted in Tear-Down, Technology | Tagged: , , , , | Leave a Comment »

Philips SlimStyle 60W LED bulb teardown

Posted by Venkatt Guhesan on September 28, 2014

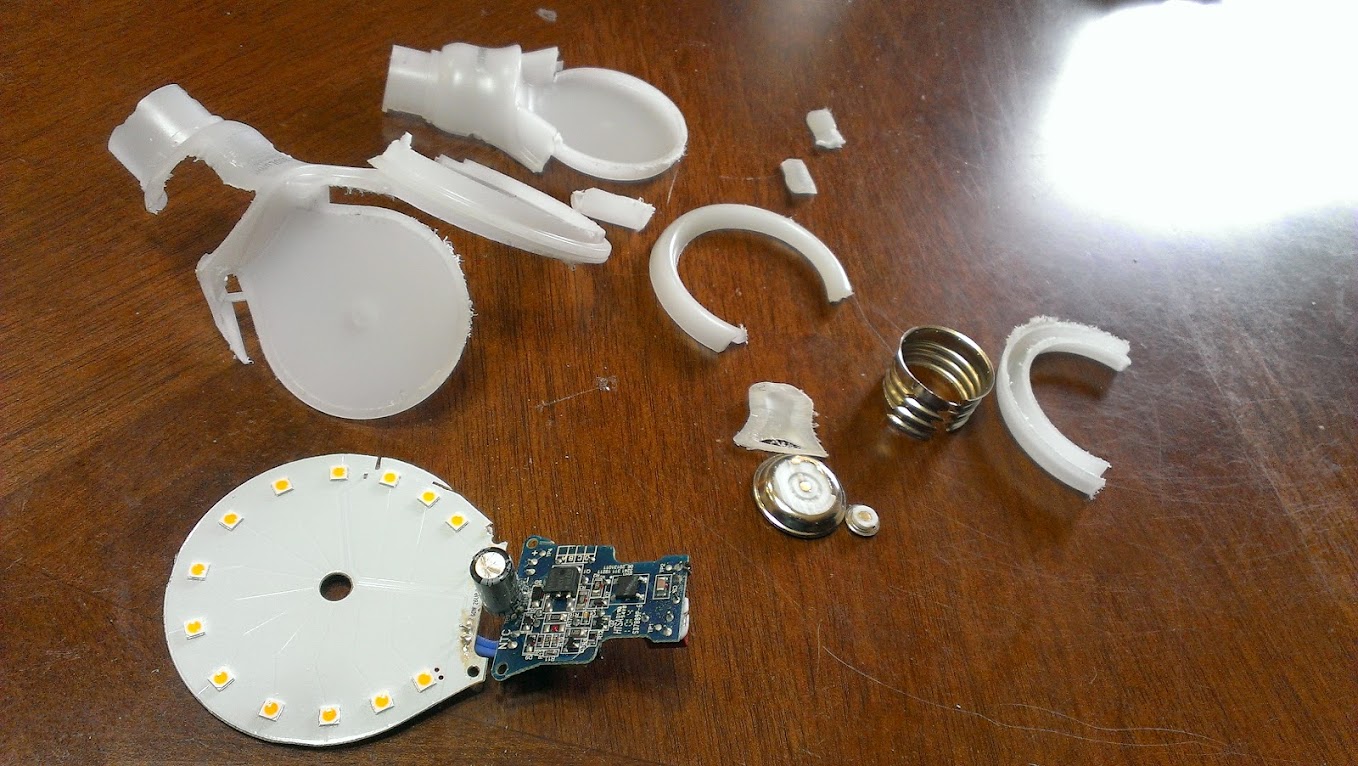
While I was visiting Home Depot, I saw a Philips SlimStyle 60W LED bulb on clearance for two-dollars. I could not resist buying it for a tear-down to see how it’s built. I always wondered how they convert the 120VAC to a regulated DC voltage with high-current feed for lighting up those LED’s. So here is the first version of the tear-down showing you what’s inside the bulb. I will blog more about the current and voltage at the LED junction on a subsequent blog.

Picture of the bulb before the tear-down. You can see the unique flat shape.

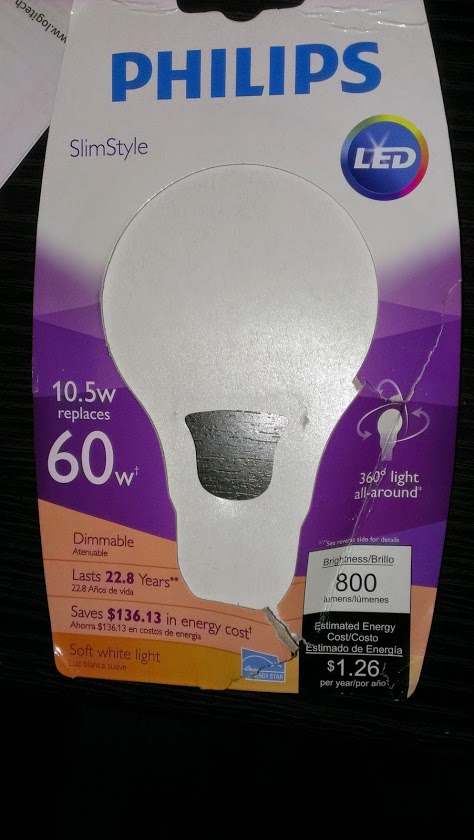
Packaging front

Packaging back

What you expect to find is a custom version of what is called in Electrical Engineering as an LED Driver Circuit (and here). What makes this one interesting is how they made this all fit inside a tiny little base. And the flat design with the beveled plastic aids in efficient heat dissipation. So you don’t see the big metal base you find in other LED bulb models.

Plastic encasing removed (cut using a band-saw)

You can see the LED’s placed in a radial manner front and back. Although the placement allows you to distribute the light you still end up with a shadow effect. (I think the incandescent light was the perfect design)

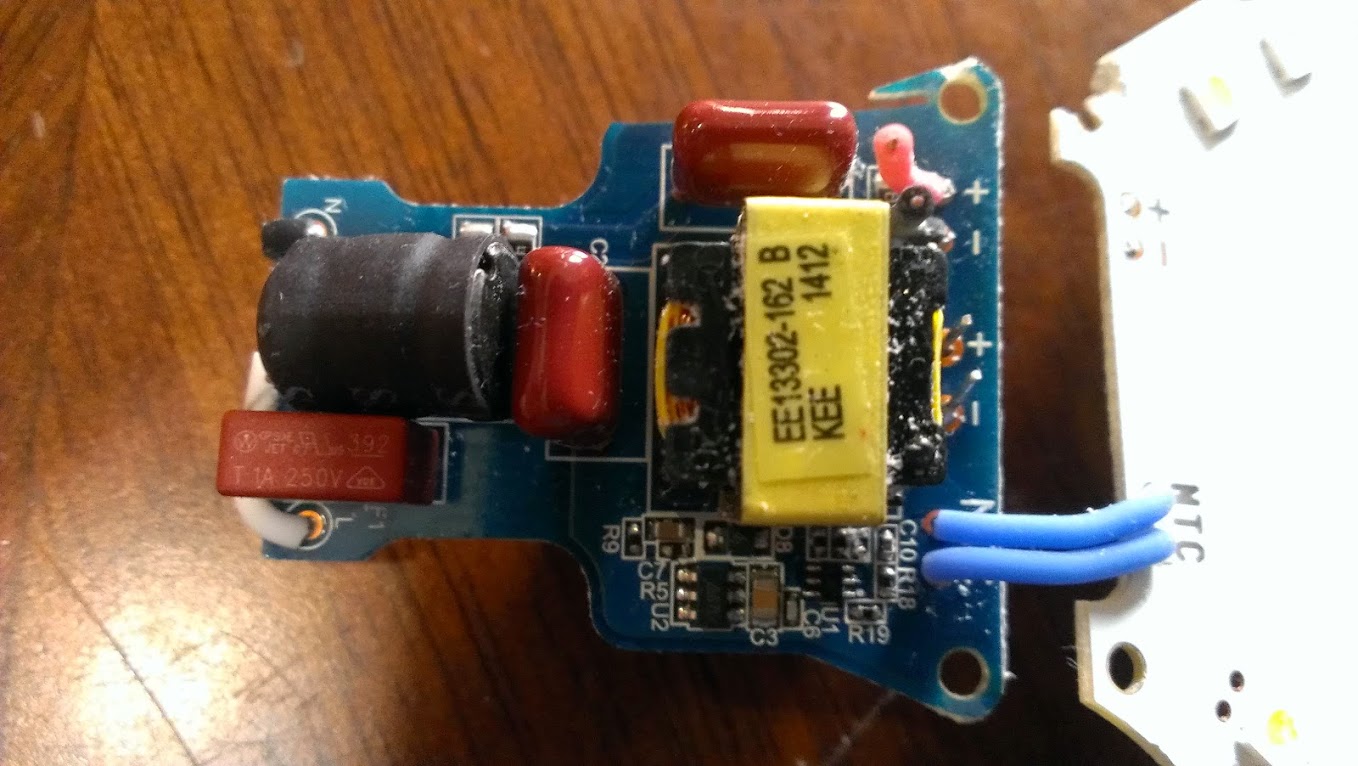
Front face of the PCB board which makes up the base of the bulb:

Transformer……….. EE13302-162 B (KEE 1412) (closest neighbor to this transformer)

Black capacitor… S103

Orange rectangular piece bottom left (with Westinghouse logo) is a standard ceramic-fuse.

The black (labeled-N) and white wires (labeled-L) gets soldered to the bulb metallic base (120VAC inputs)

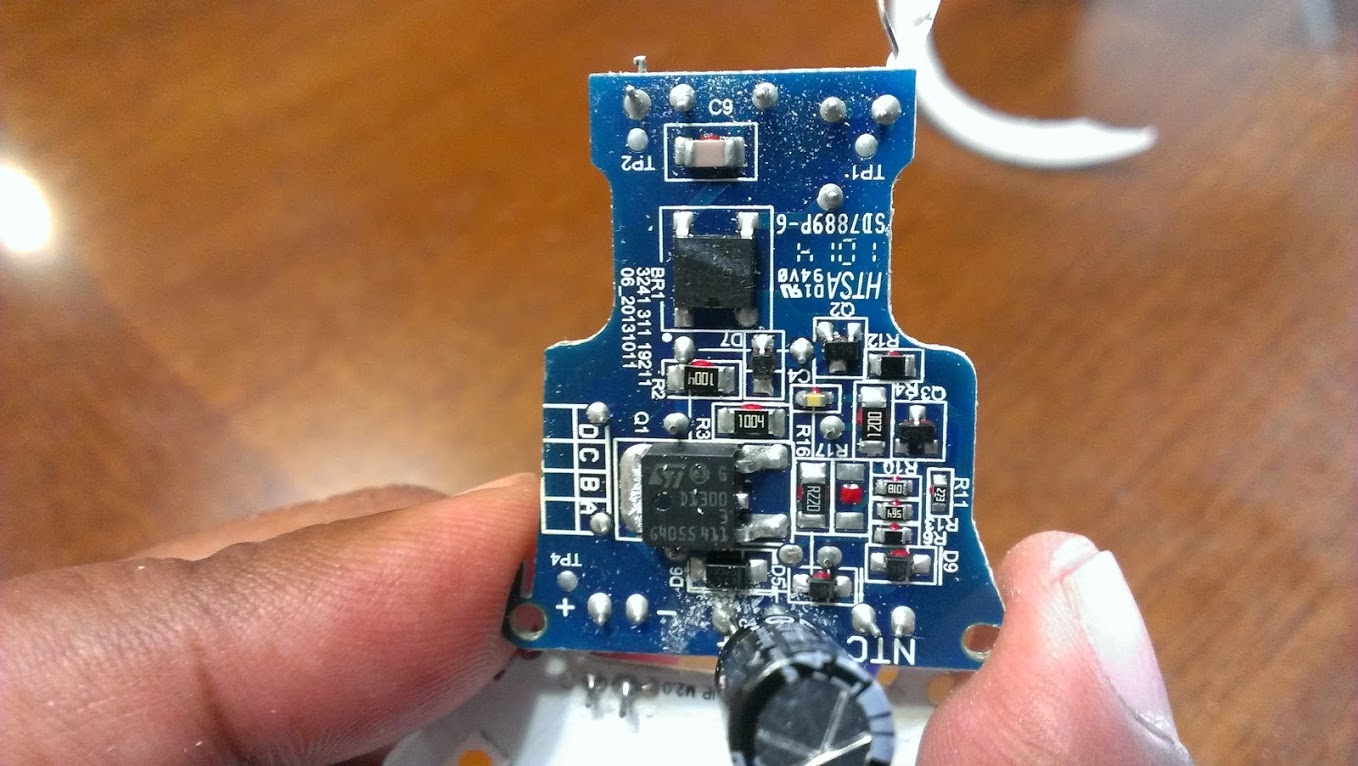
Back of the PCB board:

D1300 is a standard NPN transitor.

More to come in the next blogs. Stay tuned.

Posted in Embedded Systems, Tear-Down, Technology | Tagged: , , , , , , | 1 Comment »

Cubieboard2 with ARM AllWinner Processor - A20 finally arrived

Posted by Venkatt Guhesan on November 3, 2013

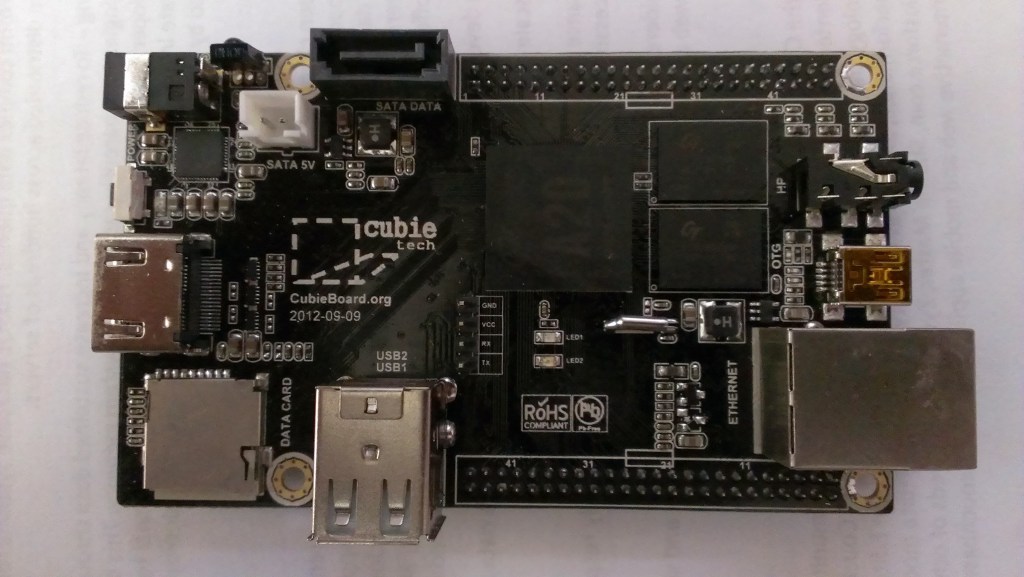
Cubieboard2 with ARM AllWinner Processor - A20 finally arrived. Pretty excited about building my ARM Linux embedded system.

CubieTruck

Learn more about Cubieboard here

Posted in CubieBoard2 & CubieTruck, Embedded Systems, Linux, Technology | Tagged: , , | Leave a Comment »

Python pycharm - configuring remote interpreters from Windows to Linux

Posted by Venkatt Guhesan on April 20, 2012

If you are an avid Python developer, you may all be excited about the new features available in the Pycharm 2.5 release, especially the remote interpreters, virtualenv and setup.py support. You can read more about the new exciting features here.

But as I started to tinker with the “remote interpreter” feature - I stumbled upon some challenges and I thought I’d document them for other PyCharm users who might benefit from this blog entry.

Let’s get right into the issue:

My Setup:

I have a Windows 7 host where I do most of my development. I develop software for a Linux based system and most of the Python libraries that I need to work from third-party vendors are only available for Linux. And so my PyCharm IDE runs on Windows and I have a VirtualBox instance of CentOS linux running within my host machine accessible via a Virtual Box - Bridged Adapter. This Linux could also be running in a separate physical host accessible via TCP-IP. Now that we have a good idea about my development environment, let’s go over why I want to use the “remote interpreters” feature.

Remote Interpreters

This feature allows you to connect with a Python environment and all’s of it’s SITE_PACKAGES available on the remote machine as if you were running it locally on your native PC. Furthermore, you can perform step-through of your code right from your development platform as if you ran the IDE right within the Linux machine. (Please note that this feature can then lend itself to running the Linux server as a terminal without a GUI/Windows Manager like KDE/Gnome). This will simplify your footprint on the server side.

Challenges

When you run the interpreter, you will run into issues such as “No such file or directory.” That’s because when you execute a file natively in Windows under c:\temp\abc.py - the “remote interpreter” is now looking for a file under that same path in the remote server under Linux. To avoid this issue, here’s the solution I have engaged.

  1. Share my c:\projects\MyProject to myself so that I can map a new drive under Windows such as “K:\MyProjects”.
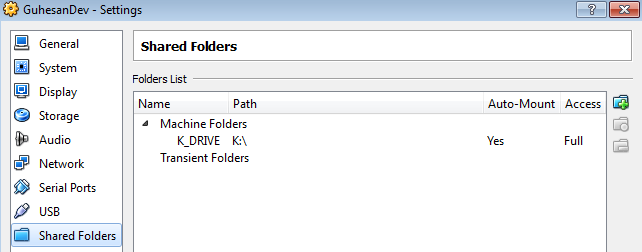
  2. Shared a “Machine Folder” to my Virtual machine. If you have a remote host, then either setup a GIT push scheme or a SFTP from your Windows to this remote server. See image below for illustration.
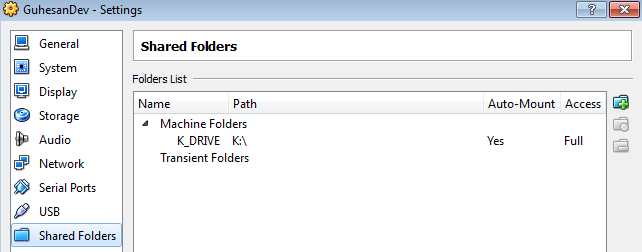
    Virtual Box - Machine Target
  3. At this time, My “c:\projects” folder is shared to the Linux environment as “/media/sf_K_DRIVE/” and “auto-mounted”. (I have also added my user-id to the “vboxsf” group because of permissions. But that’s another blog…)
  4. Now every modification of my Python files in my “K:\MyProject”, is exactly the same on the Linux virtual-box.
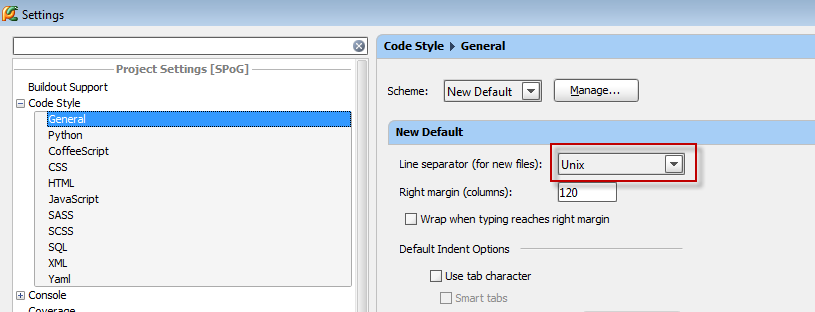
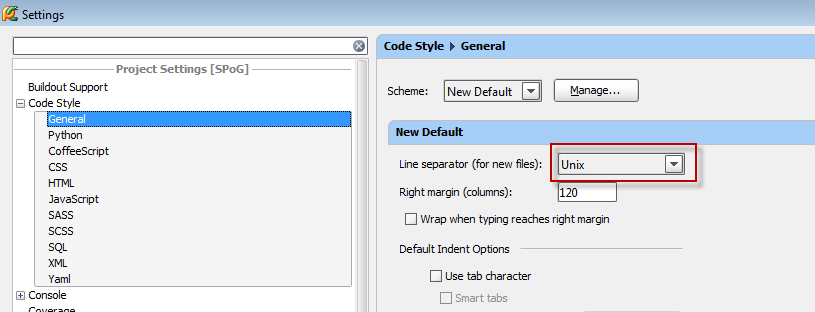
  5. The first setting to change is the “Line Seperator” (unless you want to execute Dos2Unix each time you run the file on Linux). This can be done under “Code Style” in PyCharm Settings. See image below:PyCharm Settings Line Seperator
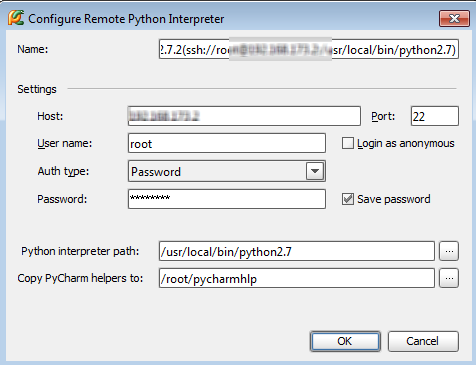
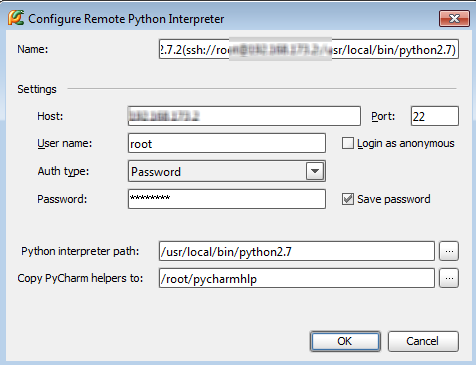
  6. Next, configure the “Remote Python Interpreter”. See screenshot below:PyCharm - Configure Remote Interpreter
  7. In the previous step, when you choose a path on the Linux server for the “PyCharm helpers”, PyCharm pushes via SSH a set of libraries and software that helps with the remote debugging and scaffolding.
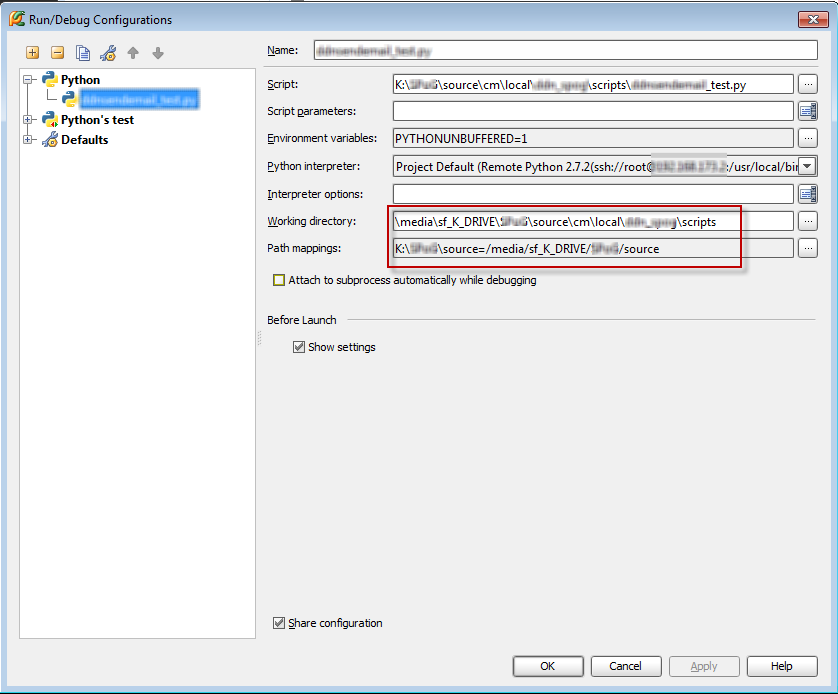
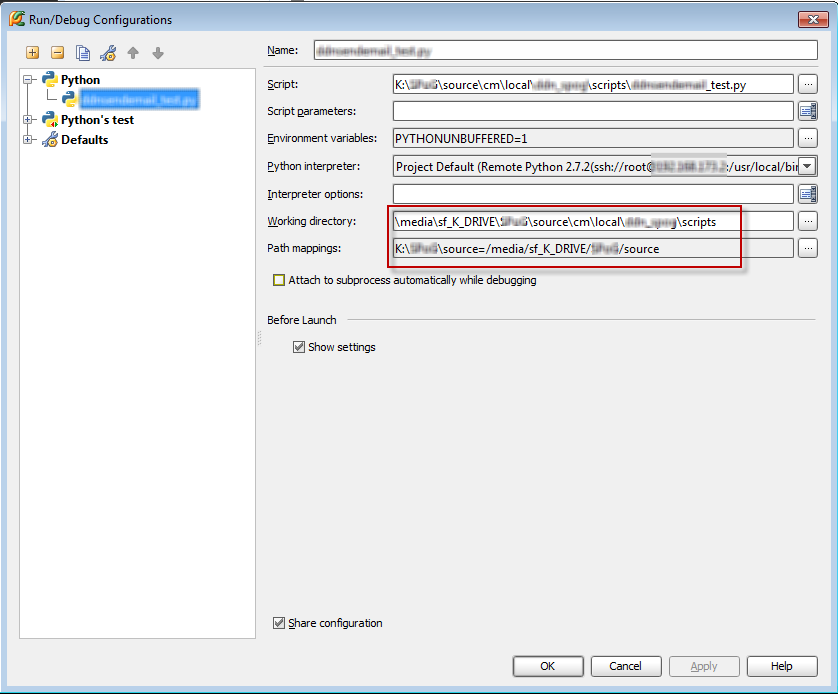
  8. The next step is to Run (or Debug) your code. See the screenshot below that shows the details of the “Run/Debug Configuration” screen. The important parts are “Working Directory” and “Path Mappings”. This is the trick that allows you to map your Windows Path to an equivalent Linux Path.PyCharm - Run/Debug Configuration Screen
  9. Now run (or debug) away your code as if it was running locally on your native Windows development platform.

That should get the job done.

Update on May 18th, 2012

#This shows you an example of how you would invoke a Python UnitTest via remote-interpreter to another script located in the same folder.

#Invoked from sendfoo_test.py
scriptName = "sendfoo.py"
# BASE_PATH is the absolute path of ../.. relative to this script location
BASE_PATH = reduce(lambda l,r: l + os.path.sep + r, os.path.dirname( os.path.realpath( __file__ ) ).split( os.path.sep ) )
#print BASE_PATH
# add ../../scripts (relative to the file (!) and not to the CWD)
NEWSCRIPTPATH = os.path.join( BASE_PATH, scriptName )
#print NEWSCRIPTPATH
#Further down in code…
p1 = os.popen("%s" % self.NEWSCRIPTPATH, "w")
p1.close()

For early Pythons…

#If you are using Python 2.6.6 (not Python 2.7+)
scriptLocation = "sendfoo.py"
scriptLocation = os.path.join( os.path.dirname( os.path.realpath( __file__ ) ), scriptLocation )
print scriptLocation
#Further down in code…
p1 = os.popen("%s" % self.NEWSCRIPTPATH, "w")
p1.close()


Posted in Programming, PyCharm, Python, Technology | Tagged: , , , , , , , , , , , , | 6 Comments »

Neat little tool for your browser toolkit - GrabNZip.com

Posted by Venkatt Guhesan on November 25, 2009

Found a neat little browser download helper tool. It’s one that I’ll be using and it’s definitely a tool to add to your browser toolkit bookmarks.

Ever been in a situation where you wanted to download a file at the office but the particular extension is not allowed at the company. Well, this tool might help you in those situations. It’s called Grab-N-Zip (http://www.GrabNZip.com)

You enter your URL to the file that you are trying to “grab” from the internet. And you specify the file-name under which you would like to receive the file and the site does the rest of the work for you. For example, at some sites they have downloads available as exe’s and I’m blocked from downloading those files. Well, this neat little tool comes in handy. It sends me the file as a zip or jpg or any other extension that’s supported.

Check it out! It might come in handy one of these days!


Posted in General, Technology | 1 Comment »

 
Follow

Get every new post delivered to your Inbox.

Join 149 other followers